 CUB CRAFTSCUB CRAFTS
Materials:
any size can
paint
small items to decorate such as foam shapes beads etc.
1. Have each boy bring a can.
2. Decorate it with any theme you choose, the decorations aren't the important part. The can itself is the message.
3. When they get done tell them this:
Anytime you feel there is something you can't do just look at this can and it will remind you that you CAN do anything you want to do and as long as you "DO YOUR BEST" you will never fail.
Put the can someplace in your room where it will remind you that YOU CAN!!!!!

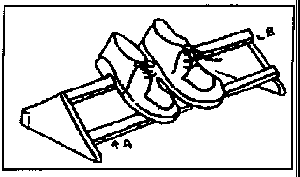
2 - 3/4 x 5 5/8 x 11 ends
3 - 3/4 x 1 1/4 x 24 rails
Hammer
Nails
Saw
1. Trace pattern on cardboard and cut out. Use this pattern to lay out ends on a single board, as shown.
2. Saw out the two ends and nail rails (A), (B), and (C) in place as indicated on drawing, using 2" nails.
3. Sand and smooth, finish with two coats of enamel. Round all edges.
Materials;
2- 6" X 4" X 1/2" plywood
2- 4" x 4" X 1" pine base
Round all plywood edges. Sand smooth and varnish so grain shows. Purchase BSA decal and glue a seal on each bookend.
Attach as base with wood-glue and 1 inch, very thin nails (finishing type). Nail holes may be sealed with wood- putty if they are set deep and then re- sanded and varnished.
Cut out a 14" high door key from either 1/4" plywood or out of 3/g" plywood. Sand the edges and top side and backside, using real fine sandpaper. Then put in the cup hooks, using as small as possible. Add stick on letters of some kind and then cover with a coat of liquid plastic or clear varnish. Let dry and you have a one meeting project and a wonderful gift for Dad.
Use a board 12 to 18 inches long. It can be any width. Center holes about 1 inch from each end. Glue pinch type clothespins evenly spaced across board. Pins should extend over bottom edge of board. Paint. (If vour boys would like - they can decorate with swirls, hearts, flowers, etc.- Toel painting style.)
Materials: 6"x 8" sheet plywood
Varnish
Wood burning set or rub- on/paste-on letters
Directions: Trace a heart pattern onto the plywood. Cut out on a jigsaw. Sand. Burn wording (or put on letters). Varnish
Make a tall slim card by folding a 6" x 9" piece of construction paper in half. lengthwise. On contrasting paper, draw 2 pop bottles, actualize. Cut out and glue one to front and one inside card. On the front near the top of the bottle - print "DO I LIKE POP?" Near the bottom, print "YOU BET I DO!" Glue a bottle cap at center. On the inside bottle, glue a bottle cap with a face drawn on it at top of bottle. Glue on paper cutout hat and tie; then on lower half of bottle - print, "BUT MY FAVORITE POP IS YOU!" To make a gift out of it too, why not tape a bottle opener to the front of the card instead of the bottle cap.
A quick easy gift for Dad, can be used on desk to hold paper together, etc. 1. Paint a wooden clothespin. Green is a good color for a crocodile. 2. Stick a toothpick through the clothespin's spring. Rest the toothpick across the mouth of a glass. Let the clothespin hang in the glass to dry. 3. Paint the crocodile's eyes and nose. Paint a crocodile design on its back. When the eyes are dry, paint an orange dot in the center of each. 4. Brush a coat of clear nail polish for a smooth and shiny finish. Keep your crocodile clip on the desk to hold important papers. Crocodile clips also make good puppets.
What's a nosebag? Something that horses ate oats from while working all day. The bag hung over the nose and was secured by a strap over the neck. And something campers use for quick snacks for quick energy on the trail. The snacks are eaten slowly over a period of time. Dried Fruits, nuts, candies, and cereals provide both quick and slow burning fuels for the feet.
Here are some ideas for Nosebag's
Friendship Mix -- Great Project for any Den
Have the group decide what they would like in thier Trail Mix
Then Assign each boy an item to bring.
1 cup each of any or all of the following
M$M's, mini pretzels, Chex or Cheerio's cereal, mini marshmallows, peanuts, raisins, goldfish crackers, any other bite size cracker like Ritz or Cheese Nips, Gummy Bears.
The ideas are endless as to what in you can put in your Mix
Have all members of the Den bring in a different item
Mix all items together in a large bowl and then divide up into zip bags for each boy to have one.
Here are some other ideas I have gotten from other scout sites on the web.
'I haven't tested any of these so you may want to try them at home first before getting the den involved
Hiker's Mix
1/4 lb. seedless raisins
1/4 lb. favorite cheese
1/4 lb. sweet or semisweet chocolate
1 apple
put in plastic bag and eat when needed
Birdseed
Make as much as you want
1 part sugar-coated cereal
1 part candy-coated chocolate
1 part roasted peanuts
Mix and munch when needed
Death Valley Special
makes a lot.. you don't have to eat all at once..
6 cups rolled oats
2 cups chopped walnuts
2 cups seedless raisins
1/2 cup chopped pitted dates
Package candy-coated chocolates
Toast rolled oats in oven preheated at 250 degrees F. Spread out oats and
walnuts in a roasting pan. Bake 1 hour, mixing from time to time. Cool,
and mix with raisins, chopped dates, and chocolates. Spoon quanity needed
in self sealing plastic bags and store remainder in covered containers for
future use.
Nuts and Bolts
1/4 lb. raisins
1/4 lb. peanuts
1/4 lb. chocolate bits or Carob bits
Broken up graham crakers or Honey graham bits
Mix and put in self sealing plastic bags to carry
Now remember to share with the other hikers
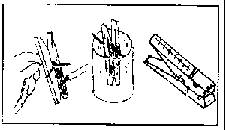
Make these clever steak markers for Dad, the Bar-b-que king! They are made from wooden skewers and corks.
Cut a hole in the narrow end of a cork and push onto the end of a skewer. Glue to hold in place. Paint the cork to resemble a chef. Label corks "W", "M", and "R". Make several of these for a set.
Gather some pretty marbles and a glass jar for this project. Choose a small baby food or mushroom jar or any other snarl, squat jar. It's nice if you can find one with an unusual shape. Paint the lid in your choice of color. When dry, glue a felt circle to the top of the lid. Fill your jar with marbles, screw the lid in place and invert the jar. This paperweight makes a gift that is pretty as well as useful.
Use a piece of leatherette or plastic measuring 8" x 12". With a pencil, lightly mark off in three sections, --two 5" wide areas for the score pad and deck of cards, and the third 2" wide for the flap.
For the card section, cut 3 strips of leatherette 1" wide, making one 10" long and two 4 1/2" long. About 1" below the flap area place the 10" strip across the card section. Sew the ends of each side, stitching along each edge of strip for 1". Tack center of strip to center of case. Now place the two short strips on the case, as shown, sewing to cross strip and at edge of the card section.
For the score pad area, cut a strip 2" x 4 1/2" and sew in place, as shown. 1 1/2" from side of case. Staple together several sheets of paper 4" x 7" for score pad. Slip bottom sheet under the strip. Fold up case, adding a button and loop for closing.
NOTE: Most boys do not like to sew, so you might be able to use a punch and eyelets (like the kind you use for making holes in belts).
Materials:
Spring type clothespins
Ice cream sticks
Toothpicks
Buttons
Pipe cleaners (optional)
Watercolors and brushes, or construction paper
White glue and pocketknife or electric wire cutters
To begin, remove the spring from the clothespin. Lay the two sticks back to back and glue them together (see figure #1). Glue on one ice cream stick for the wings or glue 2 ice cream sticks to make a biplane . A short piece of toothpick can be glued into place for the propeller. The tail and rudder are made of pieces of ice cream stick cut to size with a pocketknife or a pair of electrical wire cutters and glued into place. The wheels are buttons mounted on toothpicks that have been bent to shape but not broken. If you prefer, you may use pipe cleaners for this, but it is not necessary. If the toothpicks tend to break instead of bending, soak them in hot water for a few minutes to make them more flexible. Additional features such as windows and writing may be put on with watercolors or cut from paper and glued on. If the youngster would like to, they can make an airplane hanger from a shoe box to park the planes in.

Here are some other crafts. These clickable links will bring up A box. You must choose to save or open it. Depending on your computer you may need Windows WordPad to open them/
VALENTINE CRAFTS
CHIMNEY STARTER
HALLOWEEN CRAFTS
THANKSGIVING CRAFTS
MORE MISC. CRAFTS
CHILD ID KITS

Laura's Crochet and Crafts Home Page
My Family Page
